
How do I replace the battery in my AV-240 solar engine?
Step-by-step instructions for safely removing and replacing the battery in the AV-240 solar engine.
⚠ Remove metal jewelry — bracelets, watches, and rings — before handling the battery. Contact with battery terminals can cause a short circuit, sparks, or burns.
ℹ Door clearance note: Depending on the orientation of the signal housing, it may interfere with the solar engine door swing. If needed, further loosen the hinge screw to allow the door to move outward. In some cases, the door will need to be fully removed before the battery can be accessed.
Remove the old battery
- Loosen the solar engine door screws and swing the door open. If the door is obstructed by the signal housing, loosen the hinge screw further or remove the door entirely.
- Release the black battery strap securing the battery to the shelf and move it out of the way.
- Disconnect the quick-connect battery wires from both battery terminals — pull the connectors straight off the terminals. Do not pull by the wire itself.
- Slide the battery out of the solar engine. The beacon will stop flashing once the battery is disconnected.
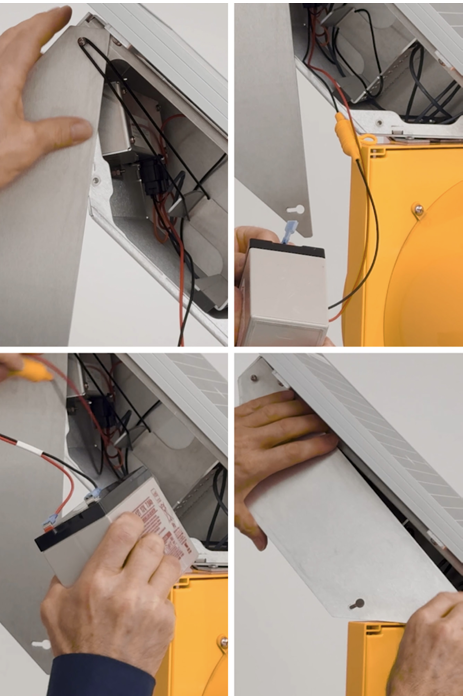
Install the new battery
-
Connect the quick-connect battery wires to the correct terminals:
- Red wire → positive terminal (+)
- Black wire → negative terminal (−)
- Slide the new battery onto the battery shelf inside the solar engine. Insert it without the terminals first — once fully seated, the terminals will be facing toward you (door side).
- The beacon will begin flashing immediately once the battery is connected. Confirm it is flashing before closing the door.
- Fasten the black battery strap over the battery to hold it securely in place.
- Swing the solar engine door shut and tighten the door screws to secure it. If the door was removed, reattach it before closing.
✕ Do not reverse battery polarity. Red wire must connect to the positive terminal (+) and black wire to the negative terminal (−). Reversing polarity will damage the system.